
Introduction to Hot Italian Sub Sliders
A Delicious Solution for Homemade Meals
Are you looking for a scrumptious dish that's quick to whip up and guaranteed to impress? Look no further than Hot Italian Sub Sliders! These delightful little sandwiches pack a big punch of flavor and are perfect for any occasion, whether it’s a casual lunch or a lively tailgate party.
The beauty of these sliders lies in their versatility. Using a combination of chicken ham, salami, and pepperoni, you're not just making a meal—you're crafting an experience everyone will remember. Did you know that sliders are often considered the ultimate crowd-pleaser? With ingredients that balance savory and spicy, your guests will be coming back for seconds—or thirds!
What’s more, you can easily double or triple the recipe to feed a hungry crowd. If you're interested in meal prep, these sliders are perfect for batch cooking. Just assemble them ahead of time, store in the fridge, and bake when you're ready to serve!
Plus, they pair beautifully with a side of marinara sauce for dipping, adding an extra layer of deliciousness. Ready to dive into the recipe? Grab your ingredients and let’s get started on making these irresistible hot Italian sub sliders!
Ingredients for Hot Italian Sub Sliders
Essential ingredients for flavor-packed sliders
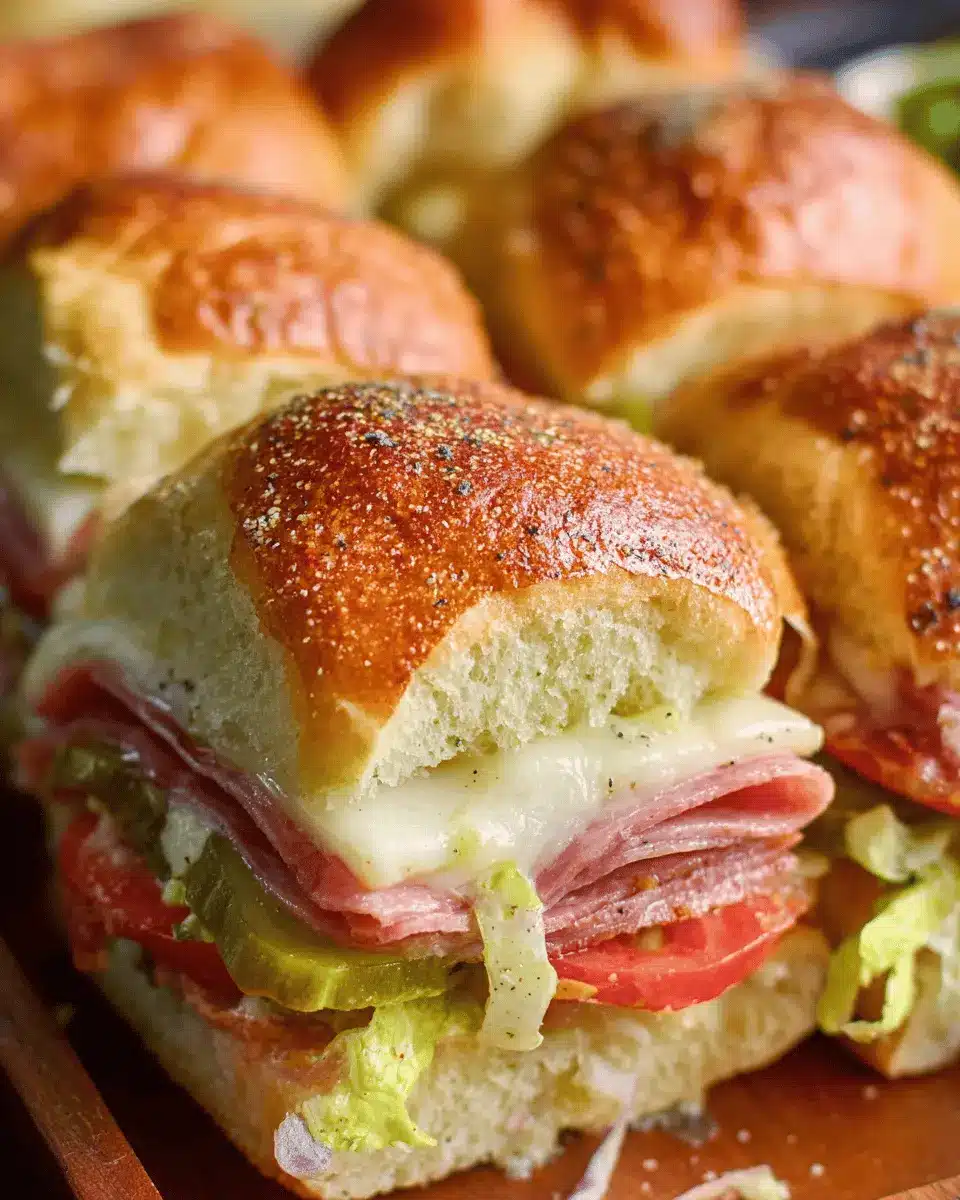
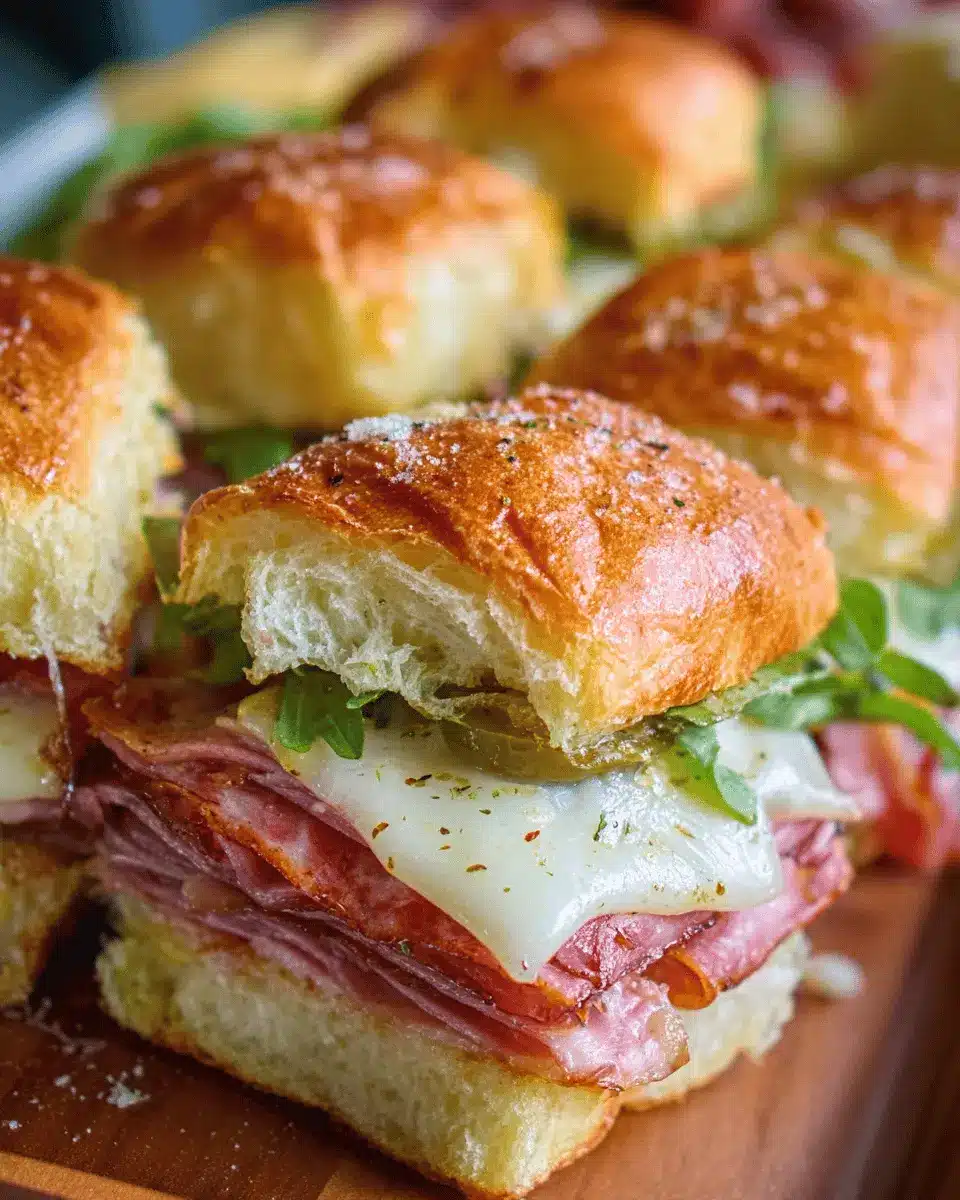
When crafting delicious hot Italian sub sliders, you’ll need a handful of key ingredients to ensure they’re bursting with flavor. Start with a package of rolls, preferably Kings Hawaiian for that touch of sweetness. The meat selection is essential—opt for thinly sliced chicken ham, salami, and pepperoni for that savory punch. Don’t forget the provolone cheese that melts into a gooey delight! Add some sliced pepperoncini and pickled hot cherry peppers for a zesty kick. Finally, whip up a savory butter mixture with Italian seasoning and crushed garlic to brush on top.
Recommended brands and alternatives
For the best results, I recommend using Kings Hawaiian rolls, but feel free to try other brands like Sara Lee or Martin’s if needed. For meats, Oscar Mayer provides great deli options, while BelGioioso or Sargento offers high-quality provolone cheese. If you prefer non-spicy, regular pickled peppers work wonders too—just adjust to your taste!
For more food inspiration, check out Food Network or Bon Appétit for pairing ideas that elevate your sliders!
Step-by-step Preparation of Hot Italian Sub Sliders
Preparing hot Italian sub sliders is not just about cooking; it’s about crafting a little slice of comfort food heaven. Let’s dive into a detailed step-by-step process that will leave your taste buds singing!
Gather and Prepare Your Ingredients
Before you begin, it's essential to have everything organized. This makes the process smoother and less hectic! Here’s what you need:
- 12 pack rolls (I recommend Kings Hawaiian rolls for that sweet touch)
- 6 oz package of chicken ham, thinly sliced
- 5 oz package of salami, thinly sliced
- 5 oz package of pepperoni, thinly sliced
- 9 slices of provolone cheese
- ⅓ cup sliced pepperoncini
- ⅓ cup sliced pickled hot cherry peppers
- ¼ cup melted salted butter
- 1 teaspoon Italian seasoning
- 2 cloves garlic, crushed (fresh is always best!)
Also, make sure you have your baking pan, pastry brush, and a mixing bowl ready to go!
Assemble the Base for the Sliders
Now, let’s put together the delicious foundation for our hot Italian sub sliders. Preheat your oven to 350°F (175°C), so it’s ready when you are.
- Lay the bottom halves of your rolls on a baking sheet, making sure they’re close together.
- Start layering! Put down the chicken ham first, followed by salami, pepperoni, and then the provolone cheese.
- Finally, sprinkle on the sliced hot cherry peppers and pepperoncini for that zesty kick.
Once everything is layered beautifully, place the top halves of the rolls back on.
Create the Flavor-Packed Butter Mixture
Flavor is key in making your hot Italian sub sliders unforgettable. In your small mixing bowl, combine the melted butter with the Italian seasoning and crushed garlic.
- Use a whisk or fork to blend everything until it's well mixed. The aroma is incredible, and you’ll want to keep it for brushing on other dishes as well!
Brush and Cover the Sliders
This next step is all about adding that mouthwatering layer of flavor and moisture:
- Use your pastry brush to generously apply the seasoned butter mixture over the tops of the sliders. Make sure to hit every nook and cranny for maximum flavor!
- Now, cover the sliders with aluminum foil to keep them moist while baking.
Bake to Perfection
Pop your sliders in the preheated oven and let them bake covered for about 30 minutes. You’ll know they’re done when the tops are golden brown and the cheese is perfectly melted.
Once baked, remove them from the oven, slice, and serve them up warm alongside a cup of marinara sauce for dipping. Bon appétit!
These hot Italian sub sliders are sure to be a hit! Whether for a casual lunch or a lively gathering, they’re a guaranteed crowd-pleaser. Enjoy!

Variations on Hot Italian Sub Sliders
Hot Italian Sub Sliders are incredibly versatile, allowing you to customize them to fit any taste preference. Here are a couple of delightful variations you might enjoy.
Veggie Version for a Lighter Option
Switching up your traditional hot Italian sub sliders for a veggie version can be a refreshing alternative. Instead of meat, layer grilled zucchini, bell peppers, and spinach with provolone cheese. Drizzle with balsamic glaze for a burst of flavor. This lightened-up version is perfect for those looking to enjoy the same satisfying taste without the extra calories.
Spicy Twist with Jalapeños
If you crave a kick, add sliced jalapeños to your hot Italian sub sliders. They’ll give each bite an extra layer of heat that pairs wonderfully with the richness of the cheese and meats. For a complete spicy experience, consider mixing some sriracha into your seasoned butter before brushing it over the tops. Trust us, your taste buds will thank you!
For more creative ideas, check out Food Network's Guide to Italian Sandwiches.
Cooking Tips and Notes for Hot Italian Sub Sliders
Key tips for perfect sliders every time
To ensure your hot Italian sub sliders come out perfectly every time, focus on even layering. Start with a generous spread of cheese to hold the meats together. Don’t rush the melting process; let them bake covered before uncovering for that golden finish. If you want a little kick, consider adding a sprinkle of crushed red pepper flakes along with the garlic.
Equipment recommendations
For the best results, I recommend using a sturdy baking pan that can accommodate all 12 sliders without overcrowding them. A pastry brush is perfect for evenly applying the seasoned butter mixture—don’t skimp here; it enhances both flavor and appearance! A small mixing bowl will make whipping up your butter blend a breeze.
For further inspiration, check out Serious Eats for more slider tips and tricks!
Serving Suggestions for Hot Italian Sub Sliders
Best sides and dips to complement the sliders
When enjoying your hot Italian sub sliders, a few sides can elevate the experience. Crispy potato wedges or sweet potato fries provide a delightful crunch. For a fresher option, consider a simple arugula salad drizzled with lemon vinaigrette. And don’t forget about dips! A warm marinara sauce is an ideal accompaniment, perfect for a satisfying dunk.
How to elevate your slider presentation
To impress your guests, elevate your hot Italian sub sliders by arranging them on a large wooden board lined with parchment paper. Garnish with fresh basil or sprigs of rosemary for a pop of color. For added flair, you can even serve the sliders with small flags or toothpicks, making them easy to grab and enjoy during your tailgate or gathering!
Time Breakdown for Hot Italian Sub Sliders
Preparation time
Get ready in just 5 minutes! This straightforward prep allows you to focus on assembling those delicious layers of flavor.
Cooking time
Allow 30 minutes for baking to achieve that perfect golden brown crust and melty cheese, creating an irresistible aroma.
Total time
In only 35 minutes, you can create hot Italian sub sliders that will have everyone asking for seconds. Perfect for any gathering or game day!
Nutritional Facts for Hot Italian Sub Sliders
Calories per slider
Each hot Italian sub slider packs around 200 calories, making it a delightful option for gatherings without weighing you down. Perfect for those who want to indulge while keeping an eye on calorie intake.
Breakdown of key nutritional components
These sliders are nutritious in multiple ways:
- Protein: Approximately 10g per slider from meats and cheese, supporting muscle health and providing lasting energy.
- Fat: About 10g, derived from butter, cheese, and meats, contributing to flavor and satiety.
- Carbohydrates: Roughly 20g, primarily from the rolls, which offer a quick source of energy.
- Sodium: With around 400mg, it's wise to enjoy these sliders in moderation, especially if you're watching your salt intake.
By swapping in ingredients like chicken ham or turkey bacon, you can still enjoy robust flavors while keeping your sliders a bit healthier. Want to delve deeper into the nutritional benefits of your favorite ingredients? Check out resources like the USDA FoodData Central.
So, whether you're hosting a casual dinner or enjoying a catch-up with friends, these hot Italian sub sliders are a deliciously satisfying option. Enjoy every bite, and feel good about what you're fueling your body with!
FAQs about Hot Italian Sub Sliders
Can I use different types of cheese?
Absolutely! While provolone is a classic choice for hot Italian sub sliders, you can easily swap it for mozzarella, gouda, or even a sharp cheddar for a twist on flavor. Each cheese brings its unique melting qualities and taste, so feel free to experiment based on your personal preferences.
How can I make the sliders healthier?
If you’re looking to lighten up your hot Italian sub sliders, consider the following tips:
- Lean meats: Substitute chicken ham with turkey or a leaner brand of deli meat.
- Bread choice: Opt for whole-grain or sprouted rolls for added fiber.
- Add veggies: Layer on extra veggies like spinach or roasted peppers for added nutrients without extra calories.
What are the best storage methods for leftovers?
To store any leftover hot Italian sub sliders, simply wrap them tightly in foil or place them in an airtight container. Refrigeration keeps them fresh for up to 3 days. For longer storage, consider freezing them—just make sure to wrap them well and they can last for a month. Heating them up in the oven restores their delightful crunch! For more tips on food storage, check out FoodSafety.gov.
Conclusion on Hot Italian Sub Sliders
In conclusion, these hot Italian sub sliders are the ultimate crowd-pleasers for any event. With layers of savory chicken ham, zesty salami, and pepperoni, combined with melted provolone, every bite is an explosion of flavor. Whether for a game day or casual gathering, they’re sure to impress!

Hot Italian Sub Sliders
Equipment
- Baking pan
- pastry brush
- small mixing bowl
Ingredients
Main Ingredients
- 12 rolls pack rolls, halved lengthwise (Kings Hawaiian rolls recommended)
- 6 oz package of ham, thinly sliced
- 5 oz package of salami, thinly sliced
- 5 oz package of pepperoni, thinly sliced
- 9 slices provolone cheese
- ⅓ cup pepperoncini, sliced
- ⅓ cup pickled hot cherry peppers, sliced
- ¼ cup salted butter, melted
- 1 teaspoon Italian seasoning
- 2 cloves garlic, crushed (fresh recommended)
To Serve (optional)
- 1 cup marinara sauce for dipping
Instructions
Preparation
- Preheat the oven to 350 degrees F.
- Lay the bottom half of the rolls on a baking sheet or pan. Layer on slices of ham, then top with salami, a layer of pepperoni and a layer of provolone. Then layer on sliced hot cherry peppers and sliced peperoncini. Replace the top bun and set aside.
- In a small bowl combine melted butter with Italian seasoning and crushed garlic. Mix to combine. Then brush the seasoned butter mixture over the top of the sliders, being sure to coat all the nooks and crannies.
- Cover the sliders with foil then bake at 350 degrees F for about 30 minutes until golden brown.
- Remove from the oven then slice and enjoy!


Leave a Reply