
Introduction to Preserving Apples
Preserving apples is not just a practical skill; it's a lifestyle game changer for young professionals juggling a busy schedule. With the rise of health-conscious living, learning how to turn fresh, seasonal apples into homemade products like apple cider vinegar can offer you a myriad of benefits. Not only does it minimize food waste, but it also provides a convenient way to incorporate delicious and nutritious ingredients into your daily meals.
One of the highlights of preserving apples is how it allows you to take advantage of bulk seasonal produce. Experts recommend exploring ways to extend the life of your fruits. The USDA notes that preserving fruits like apples can keep them safe and nutritious for up to a year. Plus, it’s an excellent way to enjoy their health benefits beyond the autumn months!
Imagine waking up to the tangy aroma of homemade vinegar or enhancing your salads with a personal touch. Whether you're a culinary novice or a kitchen guru, this simple craft opens up a world of flavors and excitement in your kitchen. So grab those apples, and let’s dive into the tasty journey of making your own homemade apple cider vinegar!
Ingredients for Homemade Apple Cider Vinegar
Making your own apple cider vinegar is not just a fun project; it’s also a fantastic way of preserving apples and reducing kitchen waste. Here’s what you’ll need to get started:
Fresh apples or apple scraps
You can use whole apples, cut into chunks, or, for a sustainable twist, collect apple scraps such as skins and cores. Aim to fill half your fermenting vessel with either option. This is not only cost-effective but also a great zero-waste solution.
Sugar and filtered water
To encourage fermentation, add sugar to your mixture. The ratio is simple: for every cup of filtered water, add 1 tablespoon of sugar. If you prefer a larger batch, use 1 cup of sugar per gallon of water. Make sure the water is lukewarm to help dissolve the sugar effectively.
Optional inoculant for fermentation
To boost the fermentation process, consider adding a splash of finished organic apple cider vinegar. This inoculant will introduce beneficial bacteria, accelerating the fermentation and enhancing flavor.
By gathering these ingredients, you’re one step closer to creating your very own homemade apple cider vinegar! For more insights on fermentation, check out resources from the National Center for Home Food Preservation.
Preparing Homemade Apple Cider Vinegar
Creating your own apple cider vinegar is a rewarding process that’s perfect for preserving apples, especially during the harvest season. Not only is it an environmentally friendly way to utilize every part of the apple, but it's also a wonderfully versatile ingredient for cooking, salad dressings, and even natural remedies. Let’s dive into the steps to make your very own homemade apple cider vinegar!
Gather and prepare your apples
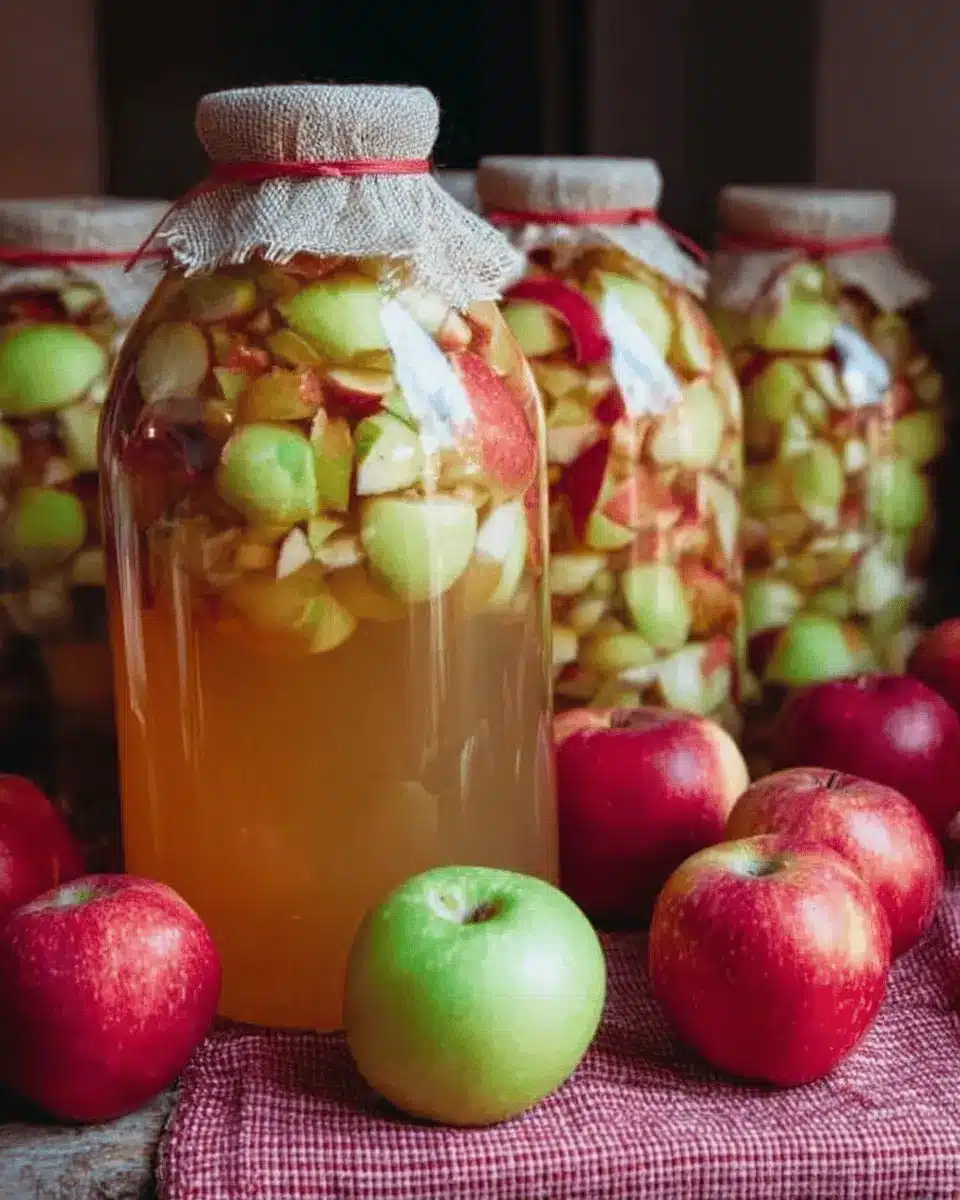
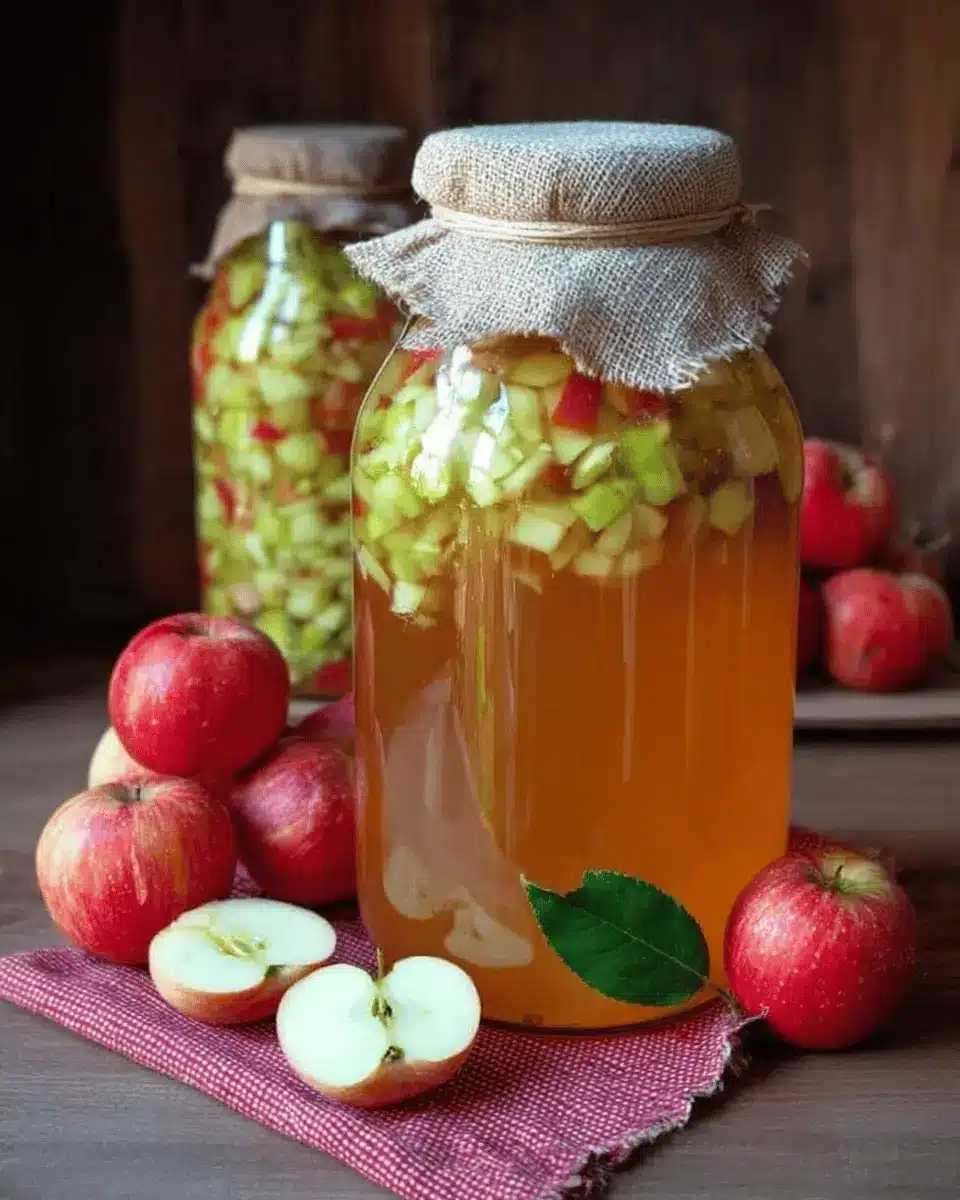
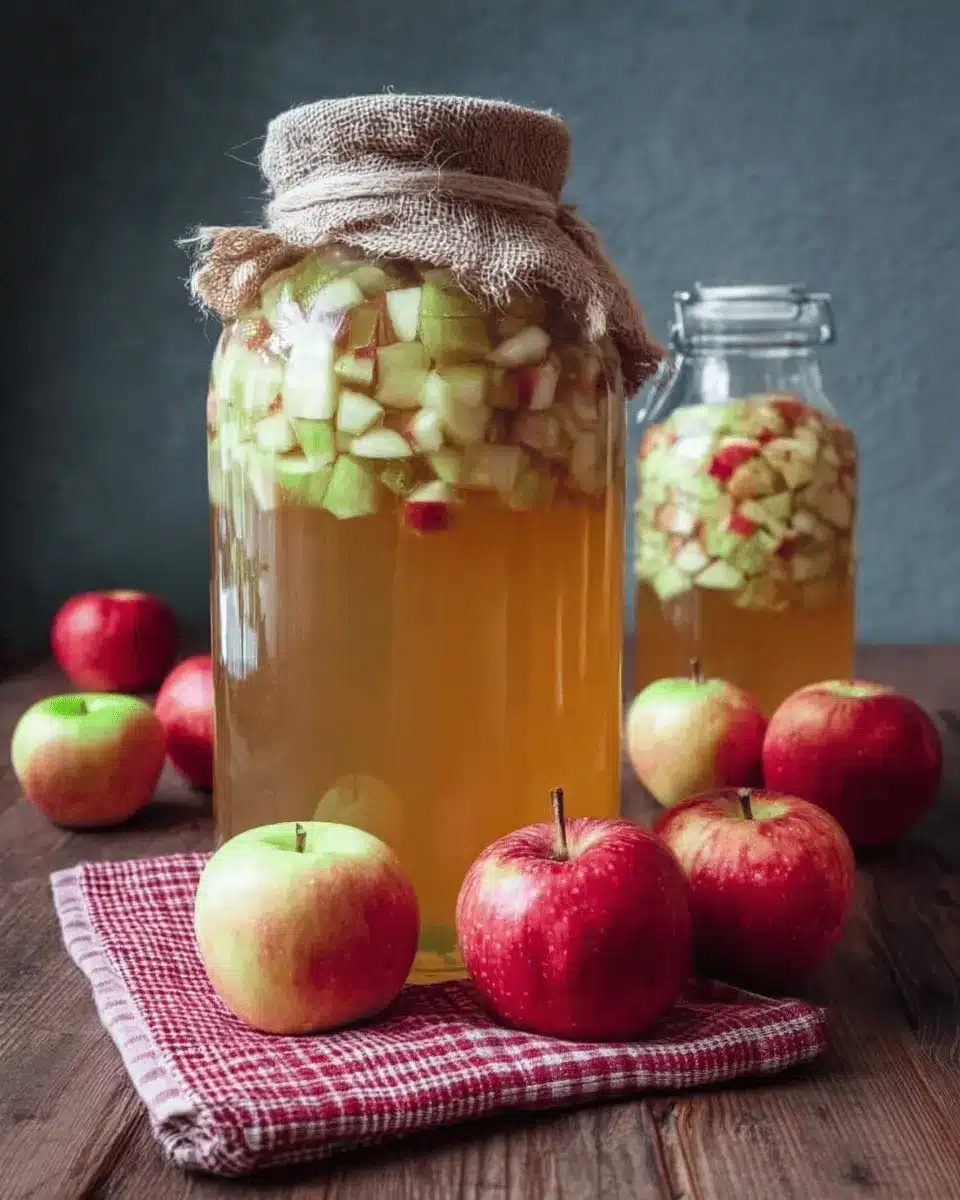
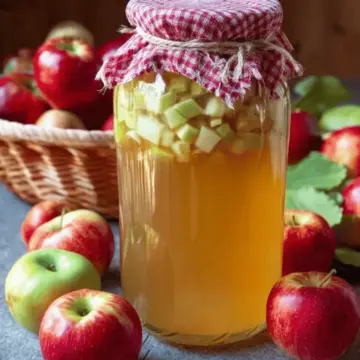
Start by gathering together your apples or apple scraps; this can include skins and cores that might otherwise go to waste. Whether you have fresh, diced apple chunks or well-loved apple bits, aim to fill your fermenting vessel (like a quart jar or crock) about halfway. Washing the apples under cool water ensures they're clean and ready for the fermenting magic to happen. Tip: If you're accumulating scraps over time, you can keep them in a freezer bag until you're ready to make vinegar!
Mix the sugars and water
Next, you'll want to mix your sugar with water to create a nurturing base for the fermentation process. Use lukewarm filtered water for optimal dilution—this helps the sugar dissolve better. The standard ratio is 1 tablespoon of sugar for every cup of water. For a larger batch, aim for 1 cup of sugar per gallon of water. This sugar isn’t just for sweetness; it feeds the natural yeasts, transforming your apple concoction into delicious vinegar.
Combine ingredients in the fermenting vessel
Pour the sugary water over your apple chunks until the vessel is almost full. It’s essential to stir the mixture thoroughly to ensure everything is well-combined. For an extra punch of flavor and beneficial bacteria, consider adding a splash of unfiltered organic apple cider vinegar to your mix. This step may give your fermentation a little boost, especially if you're new to the process.
Cover and store for fermentation
Once everything is mixed, it's time to cover your fermenting vessel with breathable material—like a cheesecloth or a coffee filter—secured by a rubber band. This allows airborne yeasts to enter while keeping out unwanted insects. Place the container in a dark spot, maintaining a warm environment of about 70 to 75 degrees Fahrenheit. Remember to stir the mixture every day to prevent mold from forming, as that can be a common concern during fermentation.
Strain and reserve the liquid
After approximately two weeks, you're ready to strain out the solids. Use a fine mesh strainer or cheesecloth to filter the mixture into a clean container, discarding the leftover apple pieces—composting is a great option! This liquid represents the initial stages of your vinegar, and it's now crucial to allow it to continue fermenting. Store it covered in a cool, dark space for another one to two months, routinely checking for taste until it reaches your preferred level of tartness.
By following these steps, you're well on your way to creating a delightful homemade apple cider vinegar, making the most of your apples while engaging in a fun DIY project. Enjoy the process and the delicious flavors you’ll achieve!
Variations on Apple Cider Vinegar
Add herbs for flavored vinegar
Elevate your homemade apple cider vinegar by infusing it with fresh or dried herbs! Think rosemary, thyme, or even basil for a zesty twist. Simply add a few sprigs (or a tablespoon of dried herbs) to your fermentation jar just before the fermentation period begins. This extra step not only enhances the flavor profile but also creates a delightful addition to salad dressings or marinades. Want to learn more about herb-infused vinegar? Check out this helpful guide from The Kitchn.
Experiment with spices for a unique twist
For another delightful variation, consider adding spices to your apple cider vinegar. Cinnamon sticks, cloves, or even a pinch of cayenne pepper can give your vinegar a new level of complexity! Just drop them into your fermentation vessel alongside the apples and herbs. Not only does this create a uniquely flavored vinegar perfect for culinary adventures, but it also offers potential health benefits as well. Curious about spice benefits? The insights from Healthline may inspire you on your flavor journey.
Cooking tips and notes for Homemade Apple Cider Vinegar
Importance of using organic apples
When preserving apples for your cider vinegar, opt for organic apples whenever possible. They are free from harmful pesticides and chemicals that can hinder fermentation. Plus, organic apples often have a more robust flavor, enhancing the overall quality of your vinegar. This small choice can make a big difference in the taste and health benefits of your homemade product.
Signs of fermentation to watch for
As your mixture sits, pay attention to the signs of fermentation. Look for bubbles forming on the surface, a slight fizz when you stir, and a tangy aroma. These indicators mean your vinegar is transforming beautifully! If you see a layer of foam or a film on top, that’s a sign of health; simply stir it back into the mix to reintegrate the beneficial bacteria. For more in-depth fermentation advice, check out this helpful guide on fermentation.
Serving Suggestions for Apple Cider Vinegar
Incorporating it into salads
Apple cider vinegar is a wonderful addition to your salads, bringing a delightful tang to your greens. Just mix 1-2 tablespoons with olive oil, a pinch of salt, and your favorite herbs for a simple homemade vinaigrette. Adding flavors like honey or Dijon mustard can elevate your dressing even further. You might find yourself drizzling it on roasted vegetables or grain bowls too, making it a versatile companion for preserving apples throughout the season.
Using it as a tangy glaze
Elevate your dishes by using apple cider vinegar as a tangy glaze. Combine it with honey or maple syrup and gently simmer until it thickens, then brush it over grilled meats like turkey bacon or chicken ham. This not only enhances the flavor but also provides a beautiful caramelized finish. Whether you’re glazing roasted veggies or meats, apple cider vinegar adds a zesty kick that is simply irresistible and a great way to add depth to your meals!
Time Breakdown for Homemade Apple Cider Vinegar
Preparation time
Setting up your homemade apple cider vinegar takes about 20 minutes. You'll wash, chop the apples, and mix with sugar and water. It’s a straightforward process!
Fermentation time
The fermentation phase lasts around 60 days. The first two weeks involve daily stirring to kickstart the fermentation process, followed by a longer period for developing flavor.
Total time
In total, expect around 60 days plus an initial 20 minutes of prep time, making this a rewarding adventure in preserving apples with minimal effort! For further insights into fermentation, check out the National Center for Home Food Preservation.
Nutritional Facts for Apple Cider Vinegar
Calories
Apple cider vinegar is incredibly low in calories, typically boasting only about 3 calories per tablespoon. This makes it a guilt-free addition to salads, marinades, or even your favorite beverages.
Probiotics Benefits
One of the standout features of homemade apple cider vinegar is its rich probiotic content. The fermentation process encourages the growth of healthy bacteria, which can aid in digestion, support gut health, and boost your immune system.
Other Health Properties
Beyond probiotics, apple cider vinegar is celebrated for its potential health benefits. Some studies suggest it may help regulate blood sugar levels and promote weight loss. Additionally, it contains antioxidants that can contribute to overall wellness. For more detailed studies on these benefits, check out Healthline.
By incorporating homemade apple cider vinegar while preserving apples, you give yourself a delicious and nutritious ingredient that enhances both taste and health in your kitchen!
FAQ about Preserving Apples and Apple Cider Vinegar
How long does homemade apple cider vinegar last?
Once you’ve crafted your own apple cider vinegar, it can last for over a year if stored properly. The key factors to look out for are visible mold or any unusual flavors. Always trust your senses! If it smells funky or looks off, it's better to err on the side of caution.
Can I use other types of apples?
Absolutely! While using tart apples like Granny Smith can yield a wonderful tang, feel free to experiment with whatever apple varieties you have on hand. Each type will impart unique flavors to your vinegar, adding a personal touch to your homemade batch!
What are the health benefits of apple cider vinegar?
Apple cider vinegar boasts numerous health benefits, including:
- Aiding in digestion
- Supporting weight loss efforts
- Helping regulate blood sugar levels
Incorporating it into your daily routine could make a positive impact on your overall health. For more insights into the benefits, consider visiting trusted health sources like WebMD or Healthline.
Embrace the art of preserving apples—it’s not just practical; it's also rewarding!
Conclusion on Preserving Apples
The Joy of Homemade Apple Products and Reducing Waste
Creating your own apple cider vinegar is a delightful way to embrace sustainability while enjoying the fruits of your labor. By preserving apples and utilizing scraps, you minimize waste and contribute to a healthier planet. So, gather those apples and start fermenting—your taste buds and the environment will thank you!
For more tips on preserving fruits and vegetables, check out The Spruce Eats for additional inspiration!
Preserving Apples: How to Make Homemade Apple Cider Vinegar
Equipment
- Fermenting vessel (jar or crock)
Ingredients
Apple Ingredients
- ½ fermenting vessel Diced apple chunks or apple scraps Fill half of the chosen fermenting vessel
- 1 tablespoon Sugar Per 1 cup filtered water
- 1 cup Sugar Per 1 gallon of filtered water
Instructions
Making Apple Cider Vinegar
- Wash and chop the apples into chunks, or gather collected apple scraps and add them to your jar or other large fermenting vessel until it filled about halfway full.
- Pour lukewarm filtered water over the apples into the container until it is almost full, but measure/note the total amount of water added.
- Stir in sugar in ratios of 1 tablespoon of sugar per cup of water added, or for larger batches, 1 cup of sugar per gallon of water added.
- Optional: Add a splash of finished organic apple cider vinegar to inoculate the culture and encourage fermenting.
- Stir combined ingredients until thoroughly mixed, and cover with breathable material.
- Store in a dark location around 70 to 75 degrees F for two weeks to ferment, and stir everyday to prevent mold from forming on top.
- After two weeks, strain and reserve the liquid into a similar sized container and cover again. Compost the spent fruit.
- Move the covered container of liquid to a location that is out of the way to continue long term fermentation.
- After one month, sample the vinegar to see if it is finished fermenting and tart to your liking.
- Once it is fermented to your desired flavor, transfer the apple cider vinegar into bottles with lids.
- Properly fermented apple cider vinegar should stay good for over a year.


Leave a Reply