
Introduction to Haunted Forest Pine Nut Cookies
When it comes to comfort food, few things evoke such warmth and nostalgia as a freshly baked cookie. Haunted Forest Pine Nut Cookies embody everything we love about this timeless treat. With their soft, buttery texture and delectable crunch of pine nuts, these cookies remind us of cozy evenings spent around a fire, nestled in the heart of nature.
The idea of cookies as a comfort food resonates with many of us. They serve as a sweet escape from the hustle and bustle of daily life, creating moments of joy with each delightful bite. Just think about it: the aroma of cookies wafting through the kitchen can instantly elevate our mood. According to a study from the Journal of Positive Psychology, indulging in familiar foods can evoke happy memories, reinforcing connections with family and friends.
These Haunted Forest Pine Nut Cookies are perfect for fall gatherings or anytime you need a little taste of home. Combining rich, velvety flavors with the unique earthiness of pine nuts, this recipe takes classic comfort food to a new level. Whether for a cozy gathering or simply to treat yourself, you’ll find that every bite is a journey into a delectable woodland escape.
For the full recipe and more baking inspiration, check out our cookie-making tips on our blog!
Ingredients for Haunted Forest Pine Nut Cookies
Creating the perfect batch of Haunted Forest Pine Nut Cookies is all about selecting the right ingredients. Let’s break it down into categories to keep things simple and ensure you have everything you need to conjure up these delightful treats!
Wet Ingredients Rundown
The foundation of your cookie starts here. You’ll need:
- 1 cup unsalted butter, softened for that rich, creamy texture.
- 1 cup granulated sugar to add sweetness and moisture.
- 1 cup brown sugar, packed, which enhances depth with its caramel notes.
- 2 large eggs to bind everything together perfectly.
- 1 teaspoon vanilla extract for that warm, inviting aroma.
These ingredients combine to create a wonderfully moist and flavorful cookie base that is essential for the Haunted Forest Pine Nut Cookies Recipe.
Dry Ingredients Essentials
On the dry side, gather the following key elements:
- 3 cups all-purpose flour for structure and that classic cookie chewiness.
- 1 teaspoon baking soda to give them a lift as they bake.
- ½ teaspoon salt to enhance all the flavors beautifully.
Mixing these dry components separately helps ensure even distribution, crucial for the overall texture of your cookies.
Add-Ins for Flavor
Now, let’s talk about the stars of the show—add-ins:
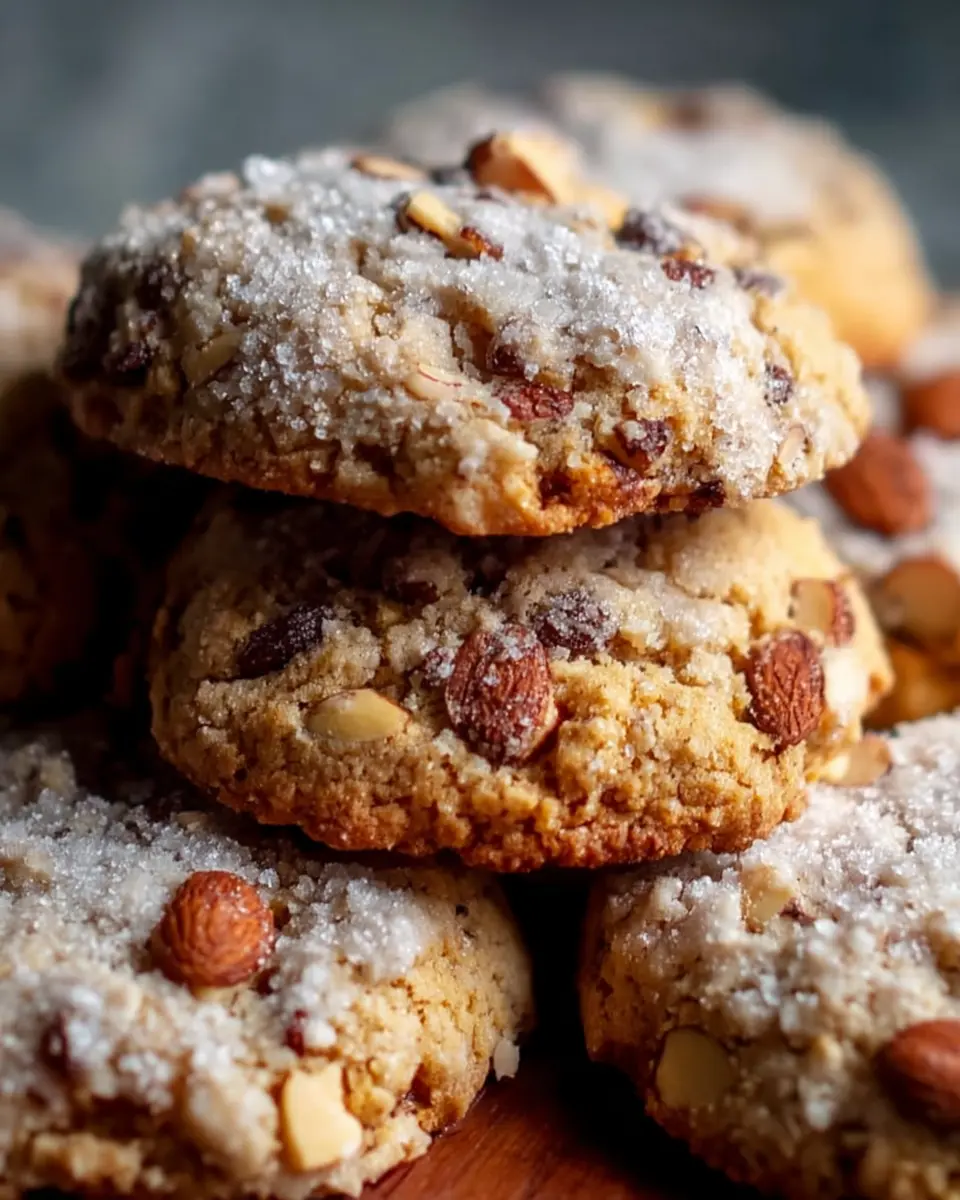
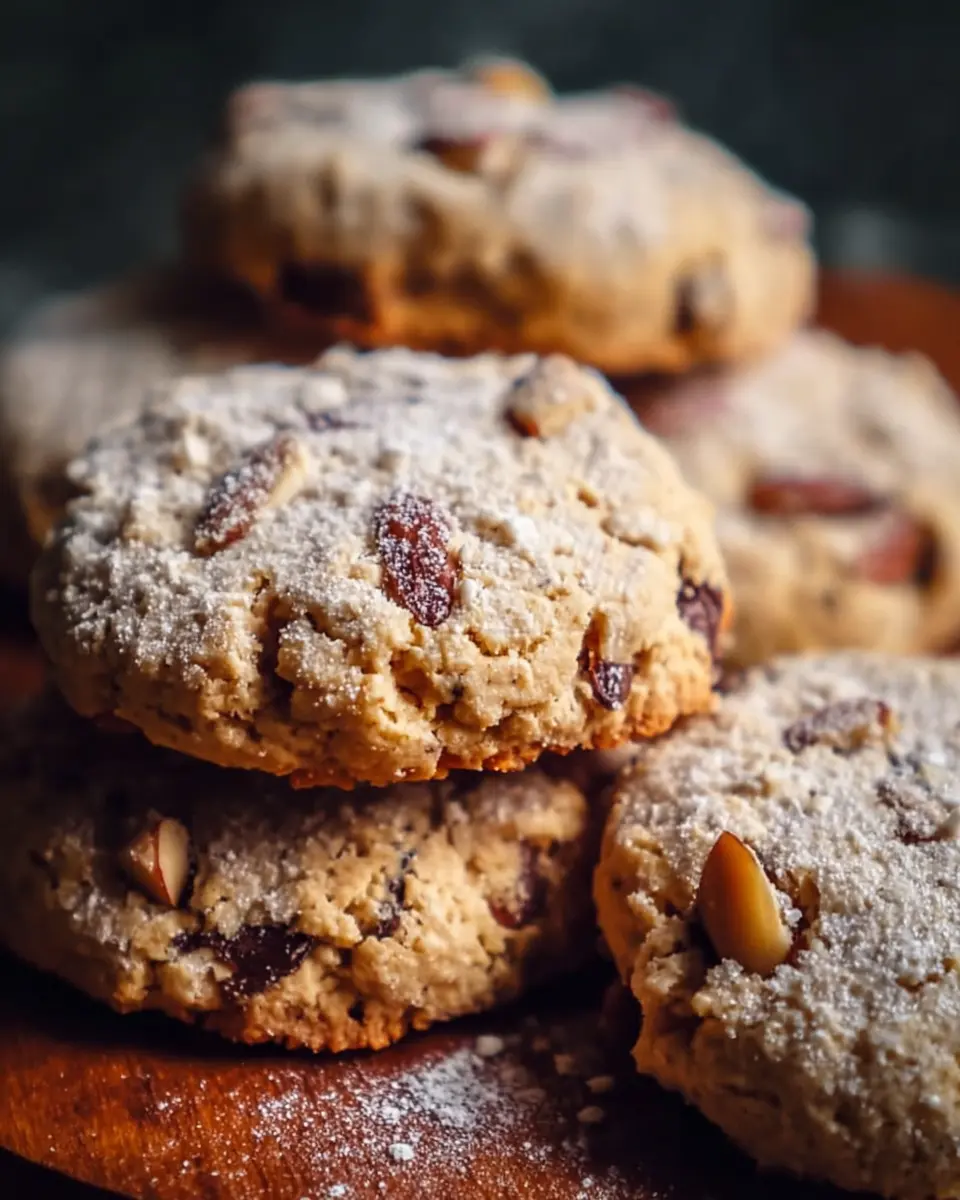
- 1 cup pine nuts for a delightful crunch and a touch of earthy flavor, enhancing the forest theme.
- Powdered sugar for dusting, which adds that final touch of enchantment and sweetness.
Feel free to experiment here! A handful of dark chocolate chips or a sprinkle of cinnamon could elevate your Haunted Forest Pine Nut Cookies, bringing a unique twist to the classic recipe.
With these ingredients in hand, you're well on your way to crafting a cookie experience that’s not only delicious but also captures the haunting essence of autumn! Happy baking!
Step-by-step Preparation of Haunted Forest Pine Nut Cookies
Baking is not just about following a recipe; it’s a delightful journey filled with aromas, textures, and flavors, especially when it comes to these Haunted Forest Pine Nut Cookies. Follow these detailed steps for a perfectly spooky treat that's sure to impress.
Gather all your ingredients
Before you dive into the mixing, ensure you have all your ingredients ready. You’ll need:
- Wet Ingredients:
- 1 cup unsalted butter, softened
- 1 cup granulated sugar
- 1 cup brown sugar, packed
- 2 large eggs
- 1 teaspoon vanilla extract
- Dry Ingredients:
- 3 cups all-purpose flour
- 1 teaspoon baking soda
- ½ teaspoon salt
- Add-ins and Toppings:
- 1 cup pine nuts
- Powdered sugar (for that final magical touch)
Cream the butter and sugars
In a large mixing bowl, beat your softened butter together with granulated and brown sugar using an electric mixer on medium speed. Aim for a light, fluffy texture. This step is crucial for achieving tender cookies—check out this butter creaming technique for more tips.
Incorporate eggs and vanilla
Add the eggs one by one, ensuring each is well combined before introducing the next. Follow this with the vanilla extract, mixing until everything is evenly distributed in the batter.
Mix the dry ingredients together
In a separate bowl, whisk together the all-purpose flour, baking soda, and salt. Mixing these dry ingredients helps to avoid any clumps and ensures your leavening agent is evenly distributed, contributing to consistent baking.
Combine wet and dry ingredients efficiently
Gradually add your dry mixture to the wet ingredients, stirring gently with a spatula or wooden spoon. Be careful not to overmix; a few flour streaks left won’t hurt. This method keeps your cookies light and fluffy.
Add in the pine nuts
Now for the fun part! Gently fold in those delightful pine nuts. They add a wonderful crunch and an earthiness that perfectly complements the sweetness of the cookies.
Portion the dough
Using a cookie scoop or tablespoon, drop rounded balls of dough onto lined or greased baking sheets, maintaining about two inches of space between them to allow for spreading.
Bake to perfection
Preheat your oven to 350°F (175°C) and bake the cookies for 10-12 minutes, watching carefully until the edges turn golden brown while the centers stay soft. This delicate timing is key for that perfect texture.
Cool and prepare for dusting
Once done, take the baking sheets out and let the cookies cool for around five minutes. This step allows them to firm up a bit before transferring to a wire rack for complete cooling.
The final enchanting touch
After your cookies have cooled, it’s time for the whimsical touch: dust each cookie generously with powdered sugar. This not only adds a sweet finish but enhances the autumn vibe, making them look straight out of a haunted forest.
Enjoy your Haunted Forest Pine Nut Cookies with a warm beverage or share them with friends for a delightful treat that evokes the charm of the season! Check out more baking tips from expert food blogs for additional inspiration.

Variations on Haunted Forest Pine Nut Cookies
Incorporating Chocolate Chips
For those who can't resist a little extra decadence, consider adding chocolate chips to your Haunted Forest Pine Nut Cookies Recipe. Fold in one cup of semi-sweet or dark chocolate chips along with the pine nuts. The rich, creamy chocolate complements the buttery texture and nutty flavor of the cookies, creating a delightful contrast. Experimenting with different types of chocolate, like milk chocolate or even white chocolate, can yield unique and personalized results. This twist will surely have your friends demanding a second batch!
Going Nut-Free
If you're baking for someone with allergies, don’t fret! You can easily modify the Haunted Forest Pine Nut Cookies Recipe to be nut-free. Simply omit the pine nuts and replace them with crispy rice cereal or a mix of seeds such as sunflower or pumpkin seeds for added crunch. Another option is to enhance the cookie with spices like cinnamon or nutmeg, which can evoke that autumn vibe without the nuts. Plus, these small changes will ensure everyone can enjoy a tasty treat without worry.
This flexibility not only lets you tailor your cookies to different dietary needs but also showcases your creativity in the kitchen!
Baking Notes for Haunted Forest Pine Nut Cookies
Tips for Soft, Tender Cookies
To achieve soft and tender cookies, it's crucial to cream the butter and sugars well. This allows air to incorporate, providing a light texture. Be sure to not overmix when adding dry ingredients; just stir until you see no more flour. Overmixing can lead to tough cookies, and no one wants that! For extra softness, let the cookie dough chill for about 30 minutes before baking.
The Importance of Ingredient Temperature
Using ingredients at the right temperature is key to the success of your Haunted Forest Pine Nut Cookies Recipe. Make sure your butter is at room temperature, as cold butter won't blend gently with sugars. Likewise, bringing eggs to room temperature helps them mix more thoroughly, creating a more consistent dough. These little steps make a big difference in flavor and texture! For more baking tips, check out this expert guide on ingredient temperatures.
Serving Suggestions for Haunted Forest Pine Nut Cookies
Create a Captivating Display
For an autumn-inspired gathering, consider presenting your Haunted Forest Pine Nut Cookies on a dark wooden platter garnished with pine needles and colorful autumn leaves. This not only enhances the haunted forest theme but also adds a rustic charm. For an extra touch, use small decorative pumpkins or candles around the platter to create an inviting atmosphere.
Perfect Beverage Pairings
Complement the delightful flavors of your cookies with warm beverages. A rich chai tea or creamy hot chocolate provides a cozy touch against the crunchy pine nuts. Alternatively, a smooth apple cider brightens the palate, enhancing your Haunted Forest Pine Nut Cookies. The warmth and spices of these drinks will elevate your cookie experience, making it a memorable treat for friends and family.
For more pairing ideas, consider sites like TeaTime Magazine or The Kitchn for beverage recipes that resonate perfectly with sweets.
Time Breakdown for Haunted Forest Pine Nut Cookies
Preparation Time
The Haunted Forest Pine Nut Cookies Recipe starts with a brisk 15 minutes of preparation. This includes gathering your ingredients and getting your mixing bowls ready.
Baking Time
Next, you'll spend about 12 minutes baking these delicious cookies to golden perfection. Keep an eye on them as they bake; the perfect cookie has crisp edges while staying soft in the center.
Cooling Time
After baking, allow your cookies to cool for about 5 minutes on the baking sheets. This rest period is essential for setting their beautiful shape before they move to the wire rack for complete cooling.
Total Time
In just 32 minutes, you’ll have a delightful batch of Haunted Forest Pine Nut Cookies ready to enjoy! It’s a quick yet rewarding process, perfect for those cozy autumn evenings.
For more baking tips and recipes, check out King Arthur Baking for expert insights!
Nutritional Facts for Haunted Forest Pine Nut Cookies
Calories per cookie
Each Haunted Forest Pine Nut Cookie contains approximately 120 calories. This delightful treat allows you to indulge while still keeping an eye on your daily intake.
Sugar content
With about 8 grams of sugar per cookie, these cookies offer a sweet balance to satisfy your dessert cravings without going overboard.
Protein levels
For those looking to boost their protein intake, each cookie provides around 2 grams, thanks in part to the nutritious pine nuts. This makes them a delicious way to treat yourself while enjoying a bit of added nutrition.
For more insights into healthy baking, check out Healthline's guide on nuts and explore how adding nutty ingredients can elevate your dishes, both in flavor and nutrition.
FAQs about Haunted Forest Pine Nut Cookies
What if I can't find pine nuts?
If pine nuts are elusive at your local grocery store, fear not! You’ve got options. Consider substituting with other nuts like chopped walnuts or almonds for a similar crunch, or even seeds like sunflower or pumpkin seeds for a nut-free alternative. While each option will slightly alter the flavor, your Haunted Forest Pine Nut Cookies Recipe will still shine with deliciousness.
How to store leftover cookies?
To keep your cookies fresh, store them in an airtight container at room temperature. They’ll stay tasty for about 5 days, though we bet they won’t last that long! For some added magic, layer them between sheets of wax paper to prevent sticking.
Can I freeze these cookies?
Absolutely! Freezing is a great way to save some Haunted Forest Pine Nut Cookies for later enjoyment. Once cooled, place them in a freezer-safe container or bag, and they can be stored for up to 3 months. When you're ready for a treat, just allow them to thaw at room temperature, and you can relive the magic! For more tips on cookie baking, check out this handy resource.
Conclusion on Haunted Forest Pine Nut Cookies
In conclusion, the Haunted Forest Pine Nut Cookies Recipe is not only a delightful treat but also a great way to bring warmth and comfort to your autumn gatherings. These cookies will charm your guests with their unique flavors and enchanting presentation. Happy baking!

Haunted Forest Pine Nut Cookies Recipe
Equipment
- mixing bowl
- cookie scoop
- baking sheets
- wire rack
Ingredients
Wet Ingredients
- 1 cup unsalted butter, softened approximately 227 grams
- 1 cup granulated sugar approximately 200 grams
- 1 cup brown sugar, packed approximately 220 grams
- 2 large eggs
- 1 teaspoon vanilla extract
Dry Ingredients
- 3 cups all-purpose flour approximately 360 grams
- 1 teaspoon baking soda
- ½ teaspoon salt
Add-ins and Toppings
- 1 cup pine nuts approximately 140 grams
- Powdered sugar for dusting
Instructions
Baking Instructions
- Gather Ingredients: Collect all ingredients in one place to ensure a smooth baking process and accurate measuring.
- Cream Butter and Sugars: In a large mixing bowl, beat the softened unsalted butter with granulated sugar and brown sugar until the mixture becomes light and fluffy.
- Add Eggs and Vanilla: Incorporate the eggs one at a time, mixing well after each addition, then add the vanilla extract and stir thoroughly.
- Mix Dry Ingredients: In a separate bowl, whisk together the all-purpose flour, baking soda, and salt to evenly distribute the leavening agent and salt.
- Combine Wet and Dry Ingredients: Gradually add the dry flour mixture to the wet ingredients, stirring just until combined.
- Fold in Pine Nuts: Gently fold in the pine nuts ensuring even distribution throughout the dough.
- Portion Dough: Using a cookie scoop or tablespoon, drop rounded balls of dough onto lined or greased baking sheets.
- Bake Cookies: Bake in a preheated oven at 350°F (175°C) for 10-12 minutes, until edges turn golden brown and centers remain soft.
- Cool Cookies: Remove the baking sheets from the oven and let cookies cool for about 5 minutes before transferring them to a wire rack.
- Final Touch: Lightly dust the cooled cookies with powdered sugar and serve on a dark wooden platter.


Leave a Reply